Wall printing machines are transforming how we think about large-scale visuals. Instead of applying vinyl, paint, or decals, these systems print high-resolution images directly onto vertical surfaces—precisely, efficiently, and with remarkable detail. In this guide, you’ll get a clear, technical breakdown of how wall printers actually work, from core components to the full printing workflow.
What Is a Wall Printing Machine?
Definition and core concept
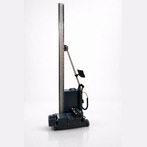
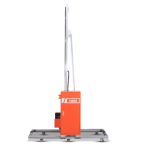
A wall printing machine is a vertical inkjet printing system designed to apply digital images directly onto surfaces such as plaster, concrete, glass, wood, or brick walls. Unlike traditional printers that operate on flat, horizontal media, these machines are engineered to move vertically along a wall while maintaining consistent print quality.
At its core, the technology combines industrial inkjet printing with a motorized vertical rail system. The machine reads a digital image file and translates it into precise ink droplets, applied line by line as it moves along the wall surface.
The key principle is simple but powerful:
Digital image → machine interpretation → controlled ink deposition → finished wall graphic
Who uses wall printers?
Wall printing machines are used across multiple industries where large-format, custom visuals are required:
- Interior designers: for murals, decorative patterns, and custom textures
- Advertising agencies: for branded walls, retail displays, and campaigns
- Hospitality businesses: hotels, cafes, and restaurants creating immersive environments
- Construction & architecture firms: integrating graphics into building design
- Artists & muralists: scaling their work with precision and speed
In short, anyone needing fast, scalable, and high-resolution wall visuals can benefit from this technology.
Core Components Explained
Understanding how a wall printer works starts with its main components. Each plays a critical role in ensuring precision, consistency, and print quality.
Printhead & ink cartridge system
The printhead is the heart of the machine. It functions similarly to traditional inkjet printers but at a larger scale and higher precision.
- Uses piezoelectric or thermal inkjet technology
- Sprays microscopic ink droplets onto the wall
- Supports CMYK and often white ink layers for dark surfaces
- Works with UV-curable or water-based inks depending on the model
The accuracy of the printhead determines image sharpness, color consistency, and gradient quality.
Wall-sensing & distance control
Printing on a wall isn’t perfectly flat—surfaces can have subtle variations. This is where distance control systems come in.
- Sensors continuously measure the gap between the printhead and wall
- Automatically adjust positioning in real-time
- Prevent ink distortion or blurring caused by uneven surfaces
This system ensures consistent print quality, even on textured or imperfect walls.
Motion system (X/Y axis)
Wall printers rely on a coordinated movement system:
- Vertical (Y-axis): moves the printhead up and down
- Horizontal (X-axis): controls lateral print coverage
The machine typically operates on a rail or modular frame attached to the wall or floor. Stepper motors or servo motors ensure smooth, vibration-free motion.
Precision here is critical—any deviation can cause banding or misalignment in the final image.
Control software & firmware
Behind the hardware is a powerful software system that manages the entire operation.
- Converts images into printable data (rasterization)
- Controls ink flow, resolution, and color profiles
- Synchronizes motion with printing
- Allows real-time monitoring and adjustments
Most systems include a user interface where operators can upload images, adjust settings, and initiate prints.
Step-by-Step Printing Process
Now let’s walk through how a wall printing job actually happens—from preparation to final output.
Surface preparation
Before printing begins, the wall must be properly prepared:
- Cleaned from dust, grease, or moisture
- Smoothed if necessary (especially for high-detail prints)
- Primed or coated depending on surface type
A well-prepared surface ensures better ink adhesion and longer-lasting results.
Image upload & slicing
The desired image is uploaded into the machine’s software.
- The image is scaled to the wall dimensions
- Software slices it into horizontal print layers
- Color calibration and resolution settings are applied
This step transforms a static image into machine-readable instructions.
Machine calibration
Before printing starts, the system performs calibration:
- Aligns the printhead with the wall
- Sets the correct distance from the surface
- Tests ink flow and nozzle performance
Calibration is crucial for avoiding issues like color inconsistency or misalignment.
Live printing phase
This is where the magic happens.
- The printhead begins at the starting point (usually bottom-left)
- Moves horizontally while printing a line
- Shifts vertically and repeats the process layer by layer
The result is a progressively revealed image, built from thousands of precisely placed ink droplets.
Depending on the size and resolution, a full wall print can take anywhere from a few hours to a full day.
Final Thoughts
Wall printing machines combine mechanical precision, digital imaging, and advanced ink technology to deliver something traditional methods simply can’t: seamless, high-resolution graphics directly on vertical surfaces.