One of the most frequently asked pre-purchase questions is: how difficult is it to set up and operate a wall printer on a client site? The honest answer for a Tudox machine is that the entire setup — from opening the transport case to loading the design file — takes approximately 15 minutes for a trained operator.
This step-by-step guide walks through the complete wall printer installation process from transport to first print, including surface assessment, machine assembly, ink preparation, software setup, and calibration. Read this once before your first setup; refer to it in the field as needed.
SETUP OVERVIEW |
Total time from transport case to first print: approximately 15 minutes. |
Tools required: none. All mounting is suction-cup or clamp-based — no drilling, no wall damage. |
Persons required: one operator. The machine is designed for solo field deployment. |
Good setup starts before you reach the client site. The 10 minutes you spend preparing the night before saves 30 minutes of troubleshooting on the day.
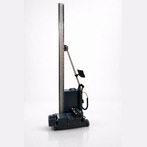
Unload the Tudox TDX-W from the vehicle. All Tudox models transport in a compact case that fits in a standard cargo van or estate car. At the site, take 60 seconds to assess the target wall:
For dark walls, confirm whether a white base coat is needed. If yes, add 30–60 minutes to your timeline for the base coat pass and a 2-minute rest period before the colour print begins.
Surface assessment is covered in detail in: What Surfaces Can a Wall Printer Print On?
The guide rail is the vertical structural spine that the print head carriage travels along. Correct rail mounting is the single most important setup step — minor misalignment at this stage creates banding or image skew in the final print.
Stand the rail vertically against the wall, positioned at the left edge of the print area. The rail should be perfectly vertical — use the built-in bubble level on the rail frame to confirm. Minor wall surface irregularities are normal; the rail is positioned against the broadest flat contact points, not flush to every surface variation.
Attach a minimum of four suction cup brackets to the wall: top-left, top-right, bottom-left, bottom-right of the rail span. Press each cup firmly onto the wall surface and engage the lever lock. On very smooth surfaces (painted plaster, composite panels) suction cups hold reliably for the full print duration. On rough or textured surfaces, use the adjustable clamp brackets as an alternative — they grip the rail without requiring wall suction.
Tip: On freshly painted walls (less than 72 hours old), use clamp brackets rather than suction cups — fresh paint can bond to the suction cup rubber and mark the wall surface when removed.
The rail defines the vertical print area. The print head’s horizontal starting position is set by the operator via the machine’s positioning controls. Set the head to the top-left corner of your intended print area. The machine will print in horizontal passes, advancing downward from this start point.
Connect the machine to the mains power supply. The machine boots in approximately 45 seconds. Once booted, check the UV ink status panel:
Normal operation: at the start of a well-maintained machine’s working day, nozzle checks are clean without any cleaning cycle required. The UV ink’s non-evaporating chemistry means nozzles stay clear between sessions.
Full ink specifications are detailed on the wall printer ink page.
Distance calibration sets the gap between the print head nozzle plate and the wall surface. The correct distance is typically 1.5–3 mm, depending on surface texture. Too close: risk of head strike on surface irregularities. Too far: ink droplets disperse before landing, reducing resolution.
Tudox machines include an ultrasonic distance sensor that automatically measures the nozzle-to-wall gap continuously during printing. After mounting, activate the auto-calibration routine from the machine’s control panel. The machine performs a horizontal scan of the wall at the print start height and sets an optimal distance profile for that surface. This takes approximately 45 seconds.
After auto-calibration, manually verify by slowly moving the carriage along the top of the print area, observing the distance indicator on the control panel. If any section of the wall protrudes significantly (a large bubble in wallpaper, an uneven patch), note the location — you may want to hand-smooth it before printing, or accept slightly reduced resolution in that area.
Connect your laptop to the machine via USB or Wi-Fi (model-dependent). Open your RIP software and load the pre-processed print file. Verify three settings before launching:
Press print. The machine begins its first horizontal pass within 3–5 seconds of the command. You can now step back and monitor progress — no manual intervention is required during printing.
Check the first 3–4 passes carefully for colour accuracy, banding, and alignment. Common indicators and responses:
Issue | Likely Cause | Response |
|---|---|---|
Horizontal banding (light stripes) | One or more blocked nozzles | Pause; run cleaning cycle; resume |
Colour shift vs. design | ICC profile not loaded correctly | Pause; reload with correct surface profile |
Image shifted or skewed | Rail not perfectly vertical | Pause; re-level rail; restart |
Ink spreading on edges | Surface too porous; head too far | Reduce distance; apply sealer to surface |
White ink not opaque | White channel pass count too low | Increase white pass setting in RIP |
Damp or tacky feel on print | Incomplete UV curing | Check UV lamp status; clean lamp lens |
Once printing is complete, the surface is immediately dry and ready to inspect. No curing time, no sealant required for standard indoor applications.
Total breakdown time: approximately 5–8 minutes. Total on-site time for a standard 20 m² mural printed overnight: setup (15 min) + print (4–8 hours) + breakdown (8 min) = machine attendance required at start and end only.
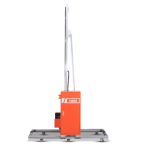
Wall and floor printing machine operators: switching to floor mode adds 5 minutes to the breakdown process as the rail is repositioned horizontally.
Mistake | Impact | Prevention |
|---|---|---|
Skipping pre-site design prep | Wrong scale; wrong file; loss of 30+ min on site | Always load and verify file before leaving for site |
Not levelling the rail | Image skew; banding across full print | Always check bubble level; 30 seconds saved now vs. reprint |
Insufficient suction cup count | Rail shifts during print; image misregistration | Minimum 4 cups; 6 for prints over 250 cm height |
Printing on dark wall without white base | Washed-out, inaccurate colours | Always assess wall colour before setup; add base pass for dark backgrounds |
Skipping nozzle check | Blocked nozzles produce missing lines through full print | 2-minute nozzle check saves hours of reprint |
Incorrect colour profile in RIP | Colours visibly different from client’s design brief | Load ICC profile for specific surface type; do test patch on paper first |
Tudox machines handle moderate surface variation (up to 10–15 mm deviation) automatically via the ultrasonic distance sensor. Larger protrusions — window frames, prominent fixtures — should be worked around by repositioning the print area boundaries. The sensor continuously adjusts nozzle distance during printing to compensate for gradual surface variation.
Yes. All Tudox models are designed for single-operator field deployment. The heaviest component (the main machine unit) is approximately 85 kg and has integrated wheels for positioning. The rail system and transport case are handled easily by one person. Most operators work solo until their business volume justifies a second team member.
Contact the Tudox support team via remote support. Most setup issues can be diagnosed and resolved via a screen-share or video call within 15–30 minutes. Tudox operators have lifetime technical support included with every machine purchase.
The 15-minute setup is not marketing language — it is the consistent experience of trained Tudox operators working on real commercial projects. The system is engineered for professional field use: quick assembly, no-drill mounting, automatic calibration, and immediate print-ready status.
The confidence to walk into any commercial space, set up in minutes, and deliver professional output is one of the core practical advantages that makes the wall printing business model work for solo operators.
Tudox Machine Limited Company
Manufactures and sells Wall Printing Machine.
Tudox Machine Limited Company
Manufactures and sells Wall Printing Machine.
Talk to our team
Fill out the form and our team will contact you.
[email protected]
+90 542 694 8714
Yeni Mah. Gaziler Cd. No:10 Çayırova/Kocaeli/Turkey
Tudox Wall Printer © 2026. All Rights Reserved.
Design & Development & Digital Marketing by Get Rank Lab
[email protected]
+90 542 694 8714
Yeni Mah. Gaziler Cd. No:10 Çayırova/Kocaeli/Turkey
Tudox Wall Printer © 2026. All Rights Reserved.
Design & Development & Digital Marketing by Get Rank Lab
WhatsApp us
Formu doldurun, istediğiniz ürün veya ürünler için teklif alın.
Fill in the form and get an offer for the product or products you want.